andyh
2015 Tourist
Posts: 953
|
Post by andyh on Sept 16, 2022 11:31:18 GMT 10
Consumables from Ural for under $350:
1x Clutch Rod Seal 72-03213-20
2x Two Slider rings 72-03207-A
2x Clutch Plates IMZ 8.1037-03013-12
6x Springs 72-03115-02
6x Screw 800799108161
While the rain set in, I figured I would pull the gearbox and have a look at the clutch. Last time I did this I had the engine out on a bench and it was a lot easier to work on. This time the engine was staying in. To get the screws out I used a small propane torch to give it a bit of heat and a rattle gun with a 5mm bit - the face of the bit had been filed off to give me a bit more depth. It required a fair bit of heat to break the loctite, apply heat, count to 60 and try. Most took a few goes before they broke, but they came out in good shape and could probably be used again (I wont as I got new ones when I ordered the plates.) Last time I did this it was really difficult and I ended up using a punch to crack them. The last one had to be drilled out. Guessing the factory loctite was used with gusto. The plates are ok, a bit glazed but less than a mm thinner the new ones. The springs are a about a mm and a half shorter than the new ones. There is a little wear in the flywheel and a small amount on the shaft (will add a photo soon) - nowhere near requiring shaft replacement which make me less inclined to pull the box apart as originally intended. Since I already have new plates and springs I will be fitting them (about $300). Getting it back together will be interesting, I have read that using a bit of non hardening gasket sealant to set the springs in the flywheel works, although I am not sure that is a good idea as it might migrate. I like the trick about marking the rear plate and flywheel so the recesses line up with the spring holes and will do that, but as for holding the springs in place initially? Lee? Any tricks / ideas? I will use the handle of the large flat spanner in the tool roll to align the plates like I did last time, but looking at it this time around I am wondering if I should have pulled the engine. Much easier on the bench....  First screw out - the C Spanner is just the right size to add a bit of a stop to the flywheel rotating. Ural have a tool for that and another to compress the plate. I use what is at hand.  Replace it with a bolt, screw the bolt in and do the locking nut up finger tight.  Replace three screws with bolts then remove the remaining screws.  Back off the locking nuts in sequence to release the spring pressure. Installation is the reverse - will post pic's when I get around to it. |
|
|
|
Post by Uralee on Sept 16, 2022 16:47:36 GMT 10
Andy, I use a small strip of tissue paper. Just one wrap around the spring is enough to hold in place. 👍
|
|
bewildered
Tool for reverse shift lever removal
Posts: 276
|
Post by bewildered on Sept 16, 2022 22:39:11 GMT 10
good schooling, thanks Andy !
|
|
andyh
2015 Tourist
Posts: 953
|
Post by andyh on Sept 18, 2022 5:39:28 GMT 10
Shots of the gear box shaft, plates and flywheel. 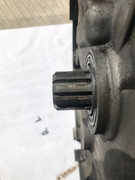 Gear Box output shaft, have seen worse posted here before - maybe they got the hardening right? 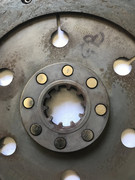 Clutch plate teeth, the tips on a new one are about 1mm wider so no real wear here either (Well not for 40K anyway)  Pressure plate teeth are fine 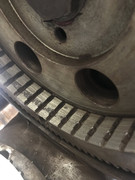 Flywheel has minor wear, no idea what caused the black streak, but it only covers a quarter of the flywheel.  Alignment shouldn't be an issue, these holes in the plates that correspond with the bolt holes. In hindsight there isn't enough wear to justify changing the plates. The new plates are 0.75mm thicker than the installed ones and there is some glazing on the pressure plates - not sure if I should address that or not. Will try some brake cleaner and see if that removes it. Last time I reassembled it I used 60% moly Dry lube sparingly on the splines, it was still evident on non mating surfaces and seems to have had more effect keeping the rust at bay than actual lubrication. It would be back together if I could find my stash of acid free tissue paper  |
|
andyh
2015 Tourist
Posts: 953
|
Post by andyh on Sept 25, 2022 12:26:06 GMT 10
Finally got some time to look at replacing the clutch. 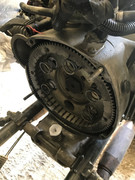 Tissue Paper to set the bottom of the springs This is where another pair of hands would be welcome. I had to get the base pressure plate in and aligned then, while holding pressure on it, lift the rest of the plates on top and engage the bolts to start the process of compressing everything. It isn't impossible, just awkward. I did this last time with the engine out... much easier. 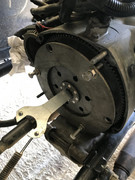 25mm Face Wrench with spoke nut on the other end fits to align the clutch plates.  Ensuring the base pressure plate (spring holder) is aligned by turning down the nuts a couple of turns each. Calibrated taps needed to get the clutch plate centered so it doesn't catch on the flywheel. 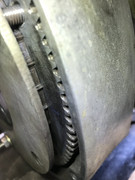 Checking alignment of the middle pressure plate, once again winding it down slowly, tapping, adjusting so it glides in and doesn't catch. Now the hard part, before I go loctiting everything I decided to check that I could actually get the gear box back on. It is one thing to say that the 25mm wrench is great to align the plates, it is another to see if it really works. In my case I am still trying. A combination of new clutch plates and imperfect alignment means I haven't managed to get the main shaft to slip onto the initial clutch plate. There isn't much room to move the box and because the engine is still in you don't have mechanical advantage. Last time I did this I borrowed a tool off Chris that resembled a primary spline. Anyone got a spare primary spline floating about that they want to lend me? (all postage paid). I will give it another go, but I am starting to think my back will be a lot happier if I pull the engine. |
|
|
|
Post by Uralee on Sept 25, 2022 12:45:03 GMT 10
……..Top gear and wriggle output flange at the same time as you hold up and wriggle the box. 🤣🤣🤣
|
|
andyh
2015 Tourist
Posts: 953
|
Post by andyh on Sept 25, 2022 16:07:33 GMT 10
And here I was thinking second gear would be ok...
Had lunch and thought about it a bit and decided the plates were not centered, the shaft was almost engaging. Went back, wiggled the 25mm wrench in all the slots, marked depth on the handle and made sure it passed through both plates without binding. measured the center and adjusted.
And that did the trick.
Don't remember it being this awkward getting the box at the right level while trying to apply forward pressure and wiggle the output drive.
Now to rig up the cable and test the pull.
|
|
|
|
Post by Uralee on Sept 25, 2022 20:03:08 GMT 10
Good to hear you are winning……👏👏👏
|
|
|
|
Post by haitch on Sept 26, 2022 21:47:32 GMT 10
Shots of the gear box shaft, plates and flywheel. Gear Box output shaft, have seen worse posted here before - maybe they got the hardening right? Clutch plate teeth, the tips on a new one are about 1mm wider so no real wear here either (Well not for 40K anyway) Pressure plate teeth are fine Flywheel has minor wear, no idea what caused the black streak, but it only covers a quarter of the flywheel. Alignment shouldn't be an issue, these holes in the plates that correspond with the bolt holes. In hindsight there isn't enough wear to justify changing the plates. The new plates are 0.75mm thicker than the installed ones and there is some glazing on the pressure plates - not sure if I should address that or not. Will try some brake cleaner and see if that removes it. Last time I reassembled it I used 60% moly Dry lube sparingly on the splines, it was still evident on non mating surfaces and seems to have had more effect keeping the rust at bay than actual lubrication. It would be back together if I could find my stash of acid free tissue paper Great instructional Andy.Well done and thanks for taking the time. |
|
andyh
2015 Tourist
Posts: 953
|
Post by andyh on Sept 29, 2022 5:29:48 GMT 10
One thing I forgot to do was order a new clutch rod seal, so an email is in to see if they have them. The seal stops anything heading down the main shaft and onto the base pressure plate. I could probably get away with using the old one, but while it is out I might as well change it. Didn't remember until I replaced the O'Rings. I cleaned up the thrust bearing and think it will last the life of the new plates. Replacement cost is around $100 so that had an influence on my decision |
|


